Sunday, 12 February 2012

More Erosion

After letting the water eroded tests dry, I then fired them to vitrification (1280 degrees). I noticed however that when they had dried, the lovely gradiented tidemarks from where the water had soaked into the bone dry clay had gone. This was dissapointing, however it meant that some of the pieces had textured form seemlessly transforming into unflawed form.

Anyway I put them in the kiln and this was the result...


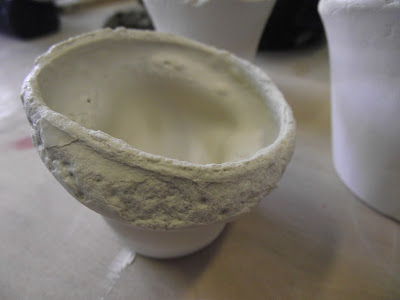
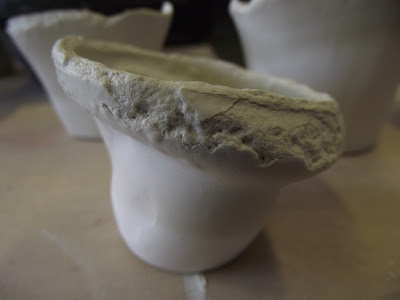
The latter ones are a combination of torn, dropped and water eroded ones. I felt as if I had to try these out on a larger form. I decided to cast one of the green plastic bowls from the plaster studio in ceramics. This was due to its sophisticated yet still simple form. The green bowl has a small foot on which lifts the curved form up off the surface it sits on just enough to give it a more elegant and uplifted overall feel. I cast one of these (as with everything else I had done so far; in porcelain) and then used the same water erosion technique on the rim of that form.


This form gives a far more refined look to the bottom half of the form, and using that in conjunction with the roughness and breakdown of the water erosion technique really seems to work. I feel that when cast in porcelain, the smooth form looks so plain and elegant, and the eroded section exposes the inside of this 'perfect' clay wall, creating not only a window into the clay body, but creating a tension between the two textures.

I want to accent this broken down texture. To do this I will explore the use of oxides and slips in the water that the form breaks down in.

Water Erosion

My next step, as mentioned in the previous post, was to create a way of altering the form without too much interference from me. This lead me to think about how natural forms alter, and why. Water was the obvious choice. A part of the clay body itself, it is one of the main elements that alters natural forms. Colossal structures can be worn away by water; and so I decided to let water have its effect on my cast forms.

Water works best at breaking down the structure of clay when it is in bone dry stage. Therefore I cast forms, let them become bone dry, and then immersed sections of the form in a bowl of water.


And the outcome...


These textures and broken down edges are incredible in my point of view. I love how they expose the clay body within the cast form. Also this unpredictability of how the bone dry clay slates off and the bubbles that form in the process is exactly what I am after. They create a juxtaposition between the smooth clay body of the cast form and the rough edges and surfaces of the eroded areas. This is definitely the method I am going to pursue, maybe alongside the dropping whilst still leather hard method.

Torn

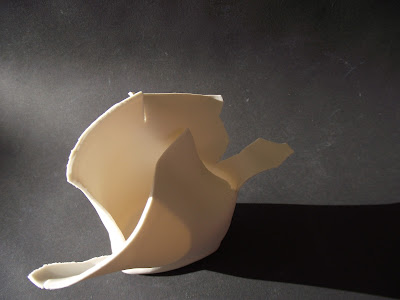
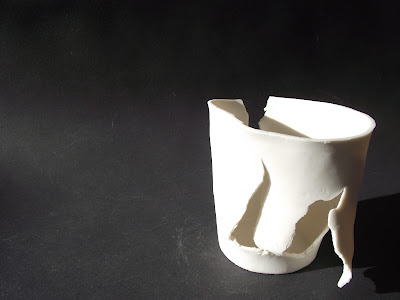
My next attempt to alter the form of the cast object was to change it whilst still plastic. To do this I took the cup forms out of their moulds when they had just released but were still soft. This meant I had a lot more freedom to distort the overall form; using methods such as dropping the object, hitting it and tearing it. Here are some pictures of the outcomes of these experiments.


The shapes, shadows and contrasts in the photos I took from these are beautiful. The uniqueness of each form relates so well to my idea of the 'personality' of each separate cast. Although they all came from the same mould, they all have their own shapes, their own imperfections and faults. This reflection to people in society works. However, I do feel with these that I am almost 'playing God' with how they end up. It is entirely in my hands how they rip or distort. This is going to be a hard concept to get around, as technically I am making these objects from start to finish, so escaping the creator aspect is nigh impossible. I do feel although, that if I let an element of chance in, something I don't control (either in entirety or at least by part), then it would reflect the forms own interaction with the environment it has been exposed to. This yet again creates a new conceptual layer.

Anyway... here are a few more (ever so slightly touched up in photoshop) images of the torn cup forms.


Friday, 3 February 2012

Bloated

So I put the pieces from the last firing (which was a 1280 degree firing) in again and took them up to 1300 degree with a half an hour soak. In this I was hoping for more warping of the form, reflecting the forms I had accidentally got at the end of last year. These are the results.


Again, even taken up past vitrifying temperatures or any temperature that porcelain should normally go to, the forms themselves didn't really distort. However one unexpected occurrence did. Weird lumps appeared on the cup forms. Initially they look like someone has just poked the form from the inside whilst leather hard, but on closer inspection they are bubble in the form's wall.
Initially I thought these would be tiny bubbles of air that had got in to the clay body when mixing up my porcelain casting slip (you have to really mix the stuff up a lot to get it to become the viscosity for casting, and this can inevitably lead to bubbles getting in). However, when talking to Andrew (a guy on the MA ceramics course) he explained that it was most likely what is known as 'bloating'. This is when the clay has been taken past its limitations and gasses have formed from the actual clay body itself, causing the clay wall to push outwards.
I quite like how this imperfection looks, and may try and mimic it again.

Thursday, 2 February 2012

Drawing with Clay

Near the end of last term, we had another experimental drawing session with Claire. This time instead of just simple blind drawing, we used clay as our material. This proved to be interesting.

I decided to use porcelain casting slip as my choice. Here are some photographs of my drawings...


These were blind drawings done using porcelain casting slip on various papers. We then had to draw our own faces, blind, and only using touch to see. Complicated no?


The marks created by this method of drawing were very interesting. However the slip, once dried, did not stick to the coloured wrapping paper I had used and began to flake off. I like the faint marks it left behind (as seen in the photo above). The overall composition of these was insteresting too, considering that we couldn't see either the subject (our faces) or the paper we were 'drawing' on.

Initial Testing

Apologies for the immense amount of time between posts. I am about to catch myself up though with hopefully a stream of them, so here goes...

To kick my project off I used casts from last years Walcott Chapel exhibition project (the one with all the cups on my last blog - (mikesmartblog.blogspot.com)). I cast a variety of cups in porcelain and set about altering their form. I did this using bone dry casts and using a variety of techniques such as tapping the cups to create hairline fractures, snapping areas of clay off, and over-fettling pieces.


So having played around with these ideas, the above are photos of what they look like unfired. I then fired them to top temperature (1280 degrees) to see if any warping occured...


This is what the cup forms looked like after being vitrified. However, they hadn't warped at all like I had expected. My next step will be to fire them again but this time to 1300 degrees and leave them for a 30 minute soak. Hopefully this will create some rather warped forms, looking more like they have actually pulled themselves apart.